
 Tweet
Tweet
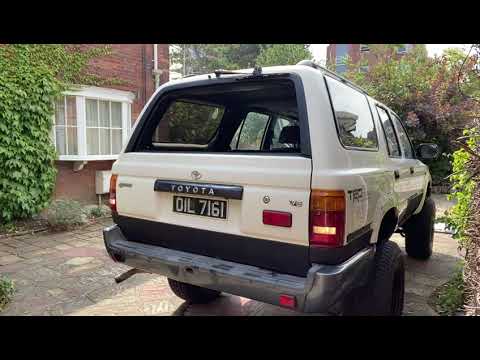
I wasn’t really looking for one, but found myself buying the 4 Runner on a bit of a whim, realising that the V6 Petrol / Manual Gearbox combo was a rare one in my years of browsing. Living in Brighton at the time, parking it on the Street with a Permit mitigated for the lack of Garage Space, so I really couldn’t think of a reason not to buy it.


The Service History was present, if not comprehensive, and a Folder of Tax Discs, Invoices and Receipts ticked that Box. There had been some Rust Work attended to around the Wheel Arches, bodywork metal held in a notorious moisture trap beneath those Wheel Arch Flares.

The Seller was the owner of a Garage that had, having serviced it for years, bought it from a Professional Cricketer, and when it arrived on the Flatbed from Halifax, I remember feeling like I had won the Lottery; finally, I owned a Toyota 4X4. The Seller's parting words were “If you ever sell it, let me know first”.

As I sat in the 4Runner, I took in the absolute joy I felt, and the fusty 1994 aroma I smelt; this thing needed a clean.
It actually spruced up pretty good, despite the 30 year old carpet, vinyl and upholstery material. Some fading, some UV bleaching and a touch of ingrained dirt notwithstanding it was quite a comfortable cabin to be in. The Stereo was broken, and tuned in to within a stones throw of clarity to Radio 4, but I wasn’t interested in the In Car Entertainment. As I fired up the V6, I took a moment for it to warm, and then popped the Bonnet for a look..
It wasn’t the cleanest Engine bay I had seen, but the simplicity and the raw mechanical nature of it was widening my smile. The 3.0L V6 reputation was one of unimprovability; it is what it is.
So with that in mind, I turned the Engine off and climbed out [and down] of the Driver Seat. I looked back as I walked away thinking that I just wanted to leave it as it is, it was perfect, but knowing that really, I wanted to make it immaculate and rust free; I just can’t help myself..
I didn't do much to it for the few couple years of ownership, the odd cosmetic job, removed the Spots, new Wheels and Tyres and took the Fender Flares off to see how bad the damage was underneath..


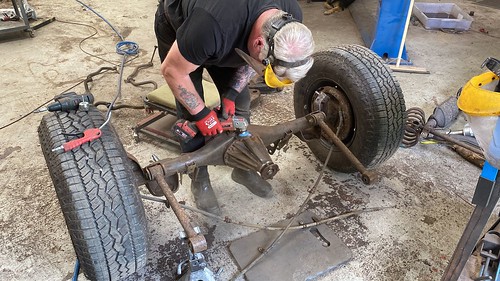
When the COVID Lockdown happened, I put it in Storage at a mate's Garage in Brighton; I had since moved back to London and didn't have the space to keep a second Motor.. A few months after the Lockdowns were lifted, I collected and decided to restore in earnest..
The Service History was present, if not comprehensive, and a Folder of Tax Discs, Invoices and Receipts ticked that Box. There had been some Rust Work attended to around the Wheel Arches, bodywork metal held in a notorious moisture trap beneath those Wheel Arch Flares.
The Seller was the owner of a Garage that had, having serviced it for years, bought it from a Professional Cricketer, and when it arrived on the Flatbed from Halifax, I remember feeling like I had won the Lottery; finally, I owned a Toyota 4X4. The Seller's parting words were “If you ever sell it, let me know first”.
As I sat in the 4Runner, I took in the absolute joy I felt, and the fusty 1994 aroma I smelt; this thing needed a clean.
It actually spruced up pretty good, despite the 30 year old carpet, vinyl and upholstery material. Some fading, some UV bleaching and a touch of ingrained dirt notwithstanding it was quite a comfortable cabin to be in. The Stereo was broken, and tuned in to within a stones throw of clarity to Radio 4, but I wasn’t interested in the In Car Entertainment. As I fired up the V6, I took a moment for it to warm, and then popped the Bonnet for a look..
It wasn’t the cleanest Engine bay I had seen, but the simplicity and the raw mechanical nature of it was widening my smile. The 3.0L V6 reputation was one of unimprovability; it is what it is.
So with that in mind, I turned the Engine off and climbed out [and down] of the Driver Seat. I looked back as I walked away thinking that I just wanted to leave it as it is, it was perfect, but knowing that really, I wanted to make it immaculate and rust free; I just can’t help myself..
I didn't do much to it for the few couple years of ownership, the odd cosmetic job, removed the Spots, new Wheels and Tyres and took the Fender Flares off to see how bad the damage was underneath..
When the COVID Lockdown happened, I put it in Storage at a mate's Garage in Brighton; I had since moved back to London and didn't have the space to keep a second Motor.. A few months after the Lockdowns were lifted, I collected and decided to restore in earnest..


Comment