
 Tweet
Tweet
There's a lot of information already on this site to install roof rails, this write up hopefully will add to that and help demystify it a bit with the pictures. I do suggest you search on here first though, get as much information as you and think through each stage in your own head.
This is my experience, and I'm happy with the result. If it goes tits up for you that's not my fault
1. What rails.
What rails fit? Pug 406, Astra and Escort roof rails have been suggested. I really fancied the idea of Cherokee rails and cross bars as I thought they'd look like some of the 4Runners I've seen on Yotatech.

The Cherokee is about 4" too wide though and they don't fit. The Kia Sedona has similar track and bar system that would fit, and Specialist Leisure do a new aftermarket track/rail system for all Surf's. Probably pricey though.
As I want to fit an expedition tray that came off an 80's series Land Cruiser I thought proper rails would be stronger (although having done the job I'm sure the track/rail system would be strong too as there's so many ribs in the roof to support it). I was offered some Pug 406 bars from one of the salvage parts websites hat send round robins to the breakers. That was �65 delivered. However Vince spurred the competitively frugal streak when he told me he only paid �10, so I wasn't too disappointed when I won some Volvo 940 rails for �16.
I'm sure there are many rails that will fit. I found myself admiring other cars roof rails for a few weeks, sizing them up and imagining them fitted. Look around. Check fitments though, I did consider Volvo 850 bars until I realised the rail has a solid base that it covered by roof trim, so the rail comes in a bow shape and would be no good.
2. What fittings?
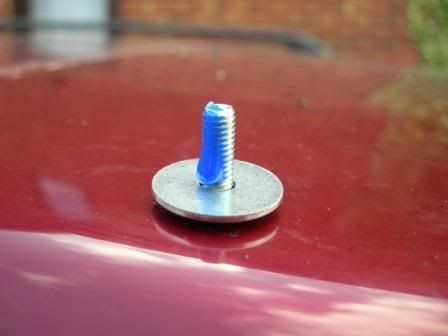
I suppose it will depend on the rails you get and how you want to fix them. My rails came with bolts and spacing lugs that must fit into the Volvo roof. I didn't want the spacers so needed to replace with M5 bolts.
I sourced, as the pic; M5 bolts, metal washer, tap washer, home made reinforcing plate from 16 gauge galvanised mild steel, 5mm grommets from Maplins and a second washer.
[
3. Strip trim.
I can't list it all here, you just need to unscrew or unbolt all that stops you pulling the trim away. It's pretty obvious once you get started, just be firm but not brutal when pulling the trim away. And don't forget the 4 musroom plugs in the roof.
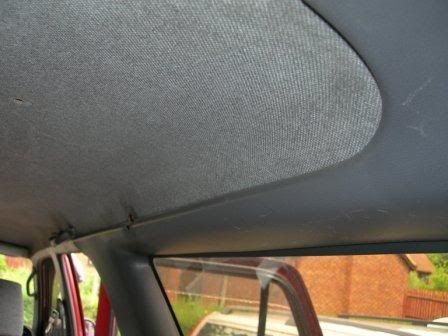
4. Drop lining.
It mostly falls down when the trim is removed, but it needs jiggling and I ended up pulling the trim away from one side rear window to get get clearsance to drop it the other side.
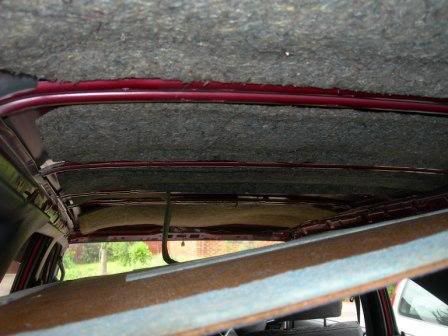
5. Mark once, mark twice....loads of times.
With the roof lining down you'll see where the ribs are and where you can and can't get fixings through. Mine hasn't a sunroof, so I didn't have that constraint. There's the wiper mechanism and housing right at the back and then a rib close to that. You can get a fixing in there, but I wanted them to run from the back of the side window so started one rib forward. Just sit the rails on the roof, see what you like the look of and what's possible with the ribs under.
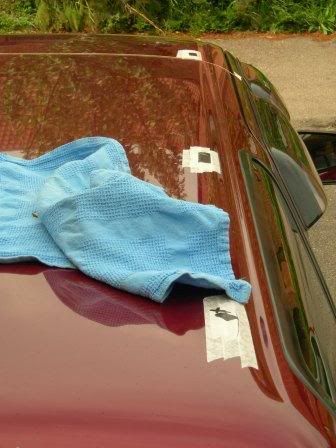
I ran some builders twine from the back of the passnger door to the back of the drivers door to give me a straight line across the roof and a line to take offset measurements.
Masking tap up roughly where the feet will go. I also put some elctric tape down near to where the fixing holes would go, and taped a screw in the fixing hole in the rail; when I positioned the rail on the roof the taped up screw left an impression in the electric tape of where to drill.
6. Pace up and down loads, recheck your measurements and generally faff about for an hour while plucking up courage to drill your roof.
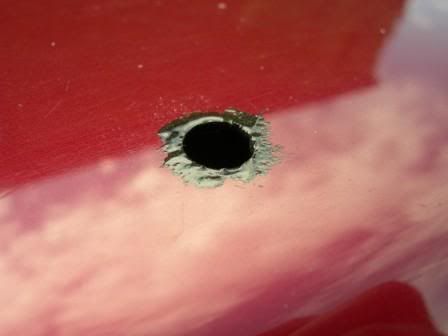
7. Drill the roof.
I practiced on some of the metal offcuts I had, and also in putting the fittings together. From that I realised it was worth getting a brand new set of metal drills and step up progressively from the pilot hole. Once I'd got over the trauma of making the first cut the rest of the holes went in easier than the practice piece.
8. Hammerite
To stop rust I also gave each hole a little fettle with a rats tail file.
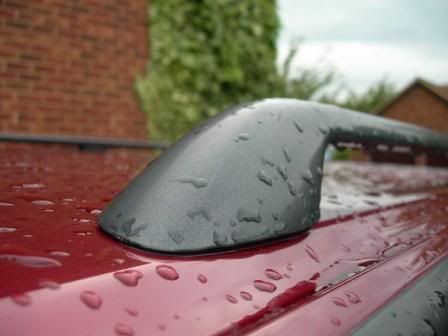
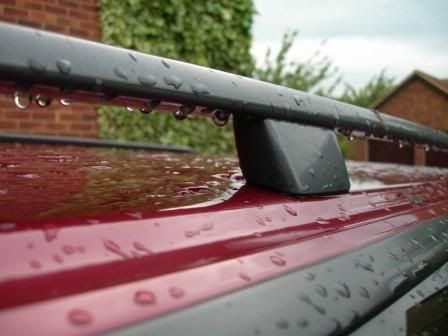
9. Fit rails.
Grommet first to seal holes.
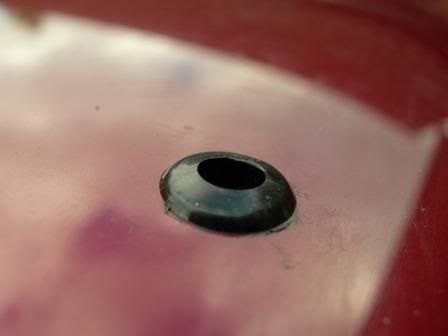
Then bolts and washers as before. Note how good a fit it is in the grommet, even with the weight of all the washers and fitment it supports itself. And a drop of locktight.
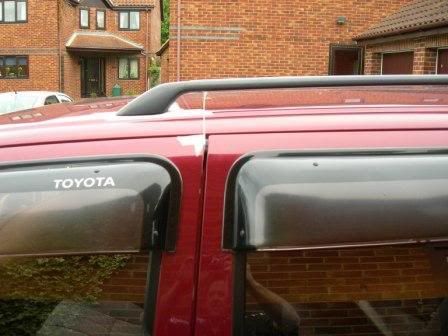
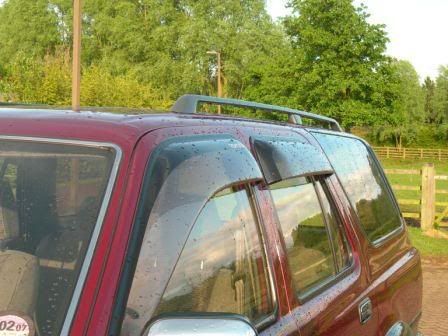
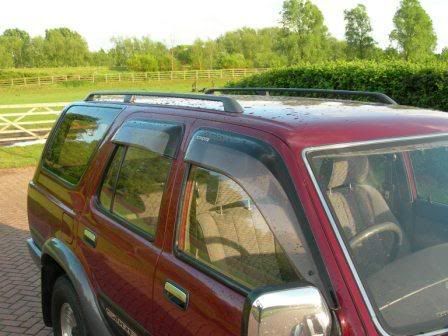
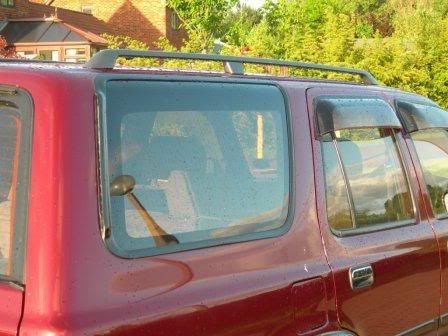
10. Admire.
10. Mishaps.
The OSF fixing was slightly out of position, didn't need to re-drill it was just a bit awkward. In the process though I lost a metal bracket that slid into the frame around the door. After an hour of trying to fish it out I gave up and cut a new bracket. Sod's law would be the lost bracket would keep reminding me it was there by clunking about.....so I spayed a load of expanding foam into the frame
This isn't a hard modification, but it is daunting to cut your car up, there's no going back. So just plan it, think it through, be methodical and measure accurately and don't rush and it'll come good
Hope that helps
This is my experience, and I'm happy with the result. If it goes tits up for you that's not my fault
1. What rails.
What rails fit? Pug 406, Astra and Escort roof rails have been suggested. I really fancied the idea of Cherokee rails and cross bars as I thought they'd look like some of the 4Runners I've seen on Yotatech.
The Cherokee is about 4" too wide though and they don't fit. The Kia Sedona has similar track and bar system that would fit, and Specialist Leisure do a new aftermarket track/rail system for all Surf's. Probably pricey though.
As I want to fit an expedition tray that came off an 80's series Land Cruiser I thought proper rails would be stronger (although having done the job I'm sure the track/rail system would be strong too as there's so many ribs in the roof to support it). I was offered some Pug 406 bars from one of the salvage parts websites hat send round robins to the breakers. That was �65 delivered. However Vince spurred the competitively frugal streak when he told me he only paid �10, so I wasn't too disappointed when I won some Volvo 940 rails for �16.
I'm sure there are many rails that will fit. I found myself admiring other cars roof rails for a few weeks, sizing them up and imagining them fitted. Look around. Check fitments though, I did consider Volvo 850 bars until I realised the rail has a solid base that it covered by roof trim, so the rail comes in a bow shape and would be no good.
2. What fittings?
I suppose it will depend on the rails you get and how you want to fix them. My rails came with bolts and spacing lugs that must fit into the Volvo roof. I didn't want the spacers so needed to replace with M5 bolts.
I sourced, as the pic; M5 bolts, metal washer, tap washer, home made reinforcing plate from 16 gauge galvanised mild steel, 5mm grommets from Maplins and a second washer.
[
3. Strip trim.
I can't list it all here, you just need to unscrew or unbolt all that stops you pulling the trim away. It's pretty obvious once you get started, just be firm but not brutal when pulling the trim away. And don't forget the 4 musroom plugs in the roof.
4. Drop lining.
It mostly falls down when the trim is removed, but it needs jiggling and I ended up pulling the trim away from one side rear window to get get clearsance to drop it the other side.
5. Mark once, mark twice....loads of times.
With the roof lining down you'll see where the ribs are and where you can and can't get fixings through. Mine hasn't a sunroof, so I didn't have that constraint. There's the wiper mechanism and housing right at the back and then a rib close to that. You can get a fixing in there, but I wanted them to run from the back of the side window so started one rib forward. Just sit the rails on the roof, see what you like the look of and what's possible with the ribs under.
I ran some builders twine from the back of the passnger door to the back of the drivers door to give me a straight line across the roof and a line to take offset measurements.
Masking tap up roughly where the feet will go. I also put some elctric tape down near to where the fixing holes would go, and taped a screw in the fixing hole in the rail; when I positioned the rail on the roof the taped up screw left an impression in the electric tape of where to drill.
6. Pace up and down loads, recheck your measurements and generally faff about for an hour while plucking up courage to drill your roof.
7. Drill the roof.
I practiced on some of the metal offcuts I had, and also in putting the fittings together. From that I realised it was worth getting a brand new set of metal drills and step up progressively from the pilot hole. Once I'd got over the trauma of making the first cut the rest of the holes went in easier than the practice piece.
8. Hammerite
To stop rust
I also gave each hole a little fettle with a rats tail file.9. Fit rails.
Grommet first to seal holes.
Then bolts and washers as before. Note how good a fit it is in the grommet, even with the weight of all the washers and fitment it supports itself. And a drop of locktight.
10. Admire.
10. Mishaps.
The OSF fixing was slightly out of position, didn't need to re-drill it was just a bit awkward. In the process though I lost a metal bracket that slid into the frame around the door. After an hour of trying to fish it out I gave up and cut a new bracket. Sod's law would be the lost bracket would keep reminding me it was there by clunking about.....so I spayed a load of expanding foam into the frame
This isn't a hard modification, but it is daunting to cut your car up, there's no going back. So just plan it, think it through, be methodical and measure accurately and don't rush and it'll come good
Hope that helps


Comment