yobit eobot.com

Announcement

Collapse
No announcement yet.

4wd occasionally

Collapse
X
 
  • Filter
  • Time
  • Show
Clear All
new posts

  • #16
    Don't mind the cold too much, it's the wind and the rain I can't stand.

    I have had a search but can't seem to find anything relevant.

    I need to be busy tomorrow the mil is visiting
    Last edited by shokenore; 19 January 2014, 22:18.
    Eat.Sleep.Surf.Repeat.

    Comment


    • #17
      Transfer Case Actuator

      Transfer Case Actuator
      The saga continues.
      After a fair few hours scouring the web trying to find some info, I was unable to find anything of relevance to removing the transfer case motor and any pictures I could find seemed to be of later 2000+ models, however I did have some success.
      To help anyone else that may struggle is are some pointers.

      Ok this is what I have done so far.

      You will need.
      14 mm socket + 6" extension + Ratchet
      10 mm socket or 10 mm spanner
      Pry bar/ big screwdriver.
      Rags
      RTV or your jointing compound of choice
      Wet n Dry paper
      Degreaser/ wd40
      Grease.


      Truck up on ramps so I can crawl underneath.
      Removed breather pipe from spigot, the pipe was brittle and crumbling and is now in the bin.
      The breather spigot was blocked with damp mud.

      The electrical snap connectors released big(ish) white plug on back of actuator body and grey plug up near the top of the body.

      You could carry out the inspection and clean up without removing the body from the transfer case but it will be incredibly fiddly and I have meat claws not delicate fingers so for me it was easier this way.

      To remove the actuator motor from the transfer case you need to remove the small cover from the passenger side of the actuator.
      This cover has 4 bolts. 10mm
      Remove this and get ready from a dribble of transfer case oil, probably better to catch the oil in a wadded up bit of rag or just let it run down/ up your arm.

      Remove the top gear, this will just pull out with your fingers.

      I use a Rose's tin lid with an old mag mount stuck on the bottom for all the little bolts and bits.

      If you look at the transfer case actuator you will see 3 14mm bolts holding the actuator to the transfer case undo these.

      With your pry bar/ big screwdriver lever against the transfer case and the motor will pop off.
      Hold onto the motor while doing this to steady it.
      You should now have the actuator in your hand.

      Retreat with the removed actuator to your clean , well lit workspace.

      You can now start the fun stuff.

      If you now undo the the 3 10mm bolts you can remove the gear cover.
      Careful not to put too much stress on the cables.
      With the cover removed you can now see the importance of breathers.
      A oily watery mess literally poured out of mine.
      The contact disk was corroded.
      The contact shoes were green.
      All the ally was either wet/oily muddy or furry.
      I spent a while with wd40 and a stiff brush removing all the oily mess and finally got rid of the mess.
      Mark where the black segments are on the contact disk in relation to the body with a sharpie or scribe.
      At this point I turned the actuator over to gain access to the small cover area.
      If you remove the small circlip you can remove the small gear and then the contact disk assembly can be removed.
      The contact disk was cleaned up and degreased and the copper shoes were also cleaned up.
      The electric motor hides away under the black dome, this is held in place with cross head screws, use a good fitting impact driver, I had to use a short extension to clear the motor housing.
      With the housing removed you can carefully remove the motor stator.
      If you route the brush cable behind the spring/brush housing you can stop the springs from shooting out.
      You can also use this method to help with sliding the stator back in place.
      Check the brushes are ok and give the copper contacts a clean with some very fine grade wet n dry.
      Refit the stator and slide back in the contact disk.
      Replace the motor cover.
      I used white grease on the gear shaft of the motor.
      I had to cut the o ring to size before re-assembly.
      A bit of grease on the housing helps with refitting the gear cover.( 3 10mm bolts)
      Make sure you don't forget the circlip.
      Back out to the truck now.
      The actuator should just pop back on.
      A bit of grease around the actuator rod o ring will help.
      I now finger tightened the 14mm bolts popped the gear back on and replaced the small cover ( 4 10mm bolts.)
      This cover may need some RTV also.
      Finally tighten all the bolts and connect all the electrics.
      AND
      Fit a decent bit of hose to the breather spigot and route it way out harms reach.

      Hope this will help.
      Attached Files
      Eat.Sleep.Surf.Repeat.

      Comment


      • #18
        Crap!!
        Sorry Ady, forgot all about those motor wires.


        So, does the T/case work now?

        Comment


        • #19
          Originally posted by BUSHWHACKER View Post
          Crap!!
          Sorry Ady, forgot all about those motor wires.


          So, does the T/case work now?
          Lol No worries
          You were spot on about the water ingress though a good egg cup full of crap oozed out!!
          I'm just surprised at the total lack of info I could find on the transfer case actuator.

          Pushing the hi lo selector to lo I can hear the motor but still no lovely green light.

          Will now have to wait till next weekend weather permitting to get back under the truck, I can't remember now which way round I had the VSV's hoses.
          Although I may now just do the ADD removal anyway......
          Eat.Sleep.Surf.Repeat.

          Comment


          • #20
            Ok mini update time.
            Sun is shining truck up on the ramps.
            Have checked that with the hi/low lever pushed forward low ratio does indeed engage.
            Checked the VSV'S are operating by engaging low ratio via the lever the vacuum is switched and I get continuity on the plunger switch on the front diff.
            However I did have the vacuum hoses around the wrong way at the VSV'S.
            These need labels.

            Checked for 12volts at the transfer case motor but nothing.

            All fuses are good.
            4wd button on hi/low has continuity.
            VSV'S are switching.

            Time for coffee and more head scratching.
            Eat.Sleep.Surf.Repeat.

            Comment


            • #21
              The A.D.D relay is above the pedals somewhere, and to make it even more frustrating it's marked up as something else, can't remember what though.
              You should be able to hear it clicking when pressing the 4wd button or shifting the transfer lever.

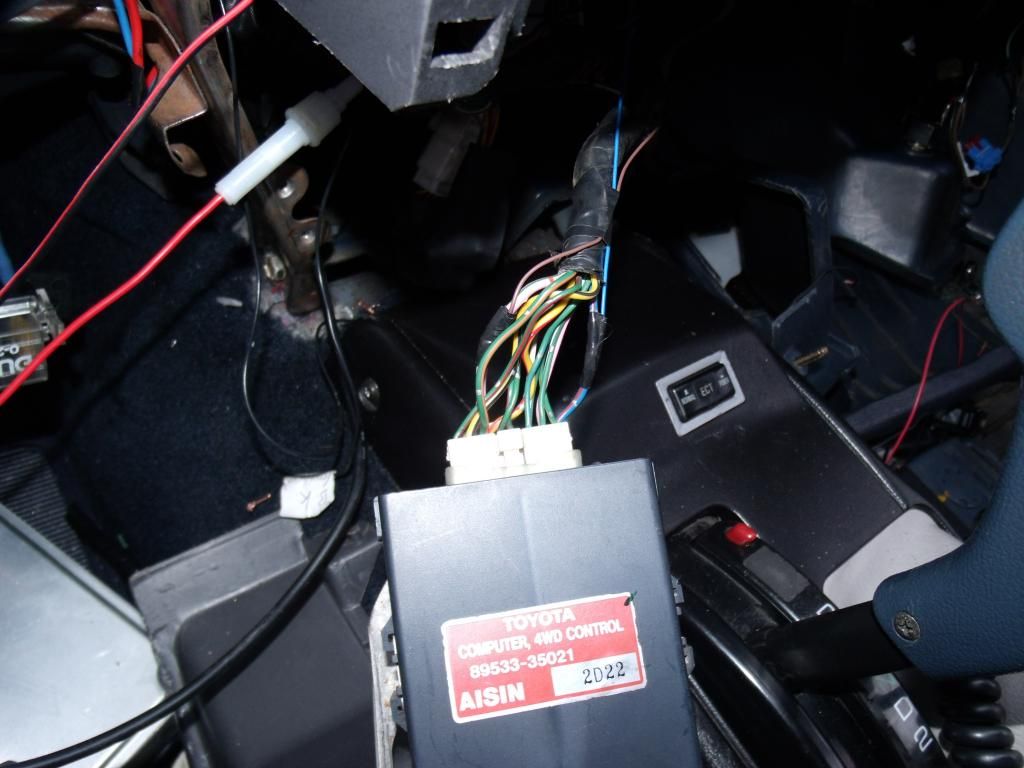
              If thats working OK, then the next possible suspect could be the 4WD ECU behind the ashtray. I have a spare here if you want it.

              Comment


              • #22
                Mini update time part 2

                I think I should have started the thread with the title "4wd occasionally Challenge Accepted"!!!

                OK
                Thanks for the suggestions Vince.

                After checking and rechecking the VSV'S and the 4WD button the 4WD ECU clicks on and off with the button and after having a grope up around the pedals I can feel a relay box clicking as well.

                With the white connector unplugged at the transfer case I get no clicking, so I think it is safe to say that the control circuit is ok.

                After plugging it all back together I think I have now narrowed it down to the transfer case motor.

                When I took it off the transfer case I did not know what position the motor and hence the actuator plunger is or was in so I just marked the position of the contact disk and assembled it back in that position.

                I do not know if the motor was at the end of its' travel ie already thinking it was in 4WD or whether it was in 2WD or any combination of the above.

                I think the contact disk is in the wrong position in relation to the plunger position.

                When I push in the 4WD button on the hi/low selector I see a voltage drop on the volt gauge on the dash indicating current draw and when the button is off the volt gauge rises back to normal.

                With the small 4 bolt cover removed from the transfer case motor housing and the gear marked I can see no movement.

                So either the motor is sticking or the motor is trying to push against the gear already at the end of its' travel.

                The actual transfer case plunger is free to move in and out.

                The transfer case motor will have to be removed and rechecked.
                Probably tomorrow when the Mother in Law is visiting.

                If I find that this is the issue I will get some pics of what position I have the contact disk in and add those to the previous pictures.
                Eat.Sleep.Surf.Repeat.

                Comment


                • #23
                  Thought I would add to this thread as it's getting spread around a few different threads now.

                  If the transfercase motor works, and you know the bulb is working but still have no 4WD light on the dash, run a couple of wires up to the dash from the 4WD ECU to a separate indicator light. I used a white LED and poked it into the whole where the original 4WD light was.
                  The truck I done this on has had the A.D.D. vacuum deleted and the transfer motor is working OK, but the the 4WD light on the dash didn't illuminate

                  FYI, the light is negative switched , so you need ignition 12v (Blue/red wire) going through a resistor to the long leg (Anode) of the LED, and the negative signal (Pink/black wire) to the shorter leg (Cathode) see photos......


                  Video...


                  Hope that is of some help.

                  Comment


                  • #24
                    Damn, my truck looks a mess

                    Comment


                    • #25
                      It'll be hoovered tomorrow.

                      Comment


                      • #26
                        Working is good for me I can use a hoover when it's home

                        Comment


                        • #27
                          Good idea Vince
                          I can frig the 4wd ECU into thinking it's in 4wd by linking out the plunger switches.
                          I can also lock it into 4wd by manually locking the selector fork on the transfer case.
                          It's just the blooming transfer case motor.....
                          Plan is to get under the truck tonight check I am getting 12volts at the motor
                          Then if so pull the motor off and check the windings if it's goosed then new motor
                          Thanks for all you help and advice Vince I owe you .
                          Ady
                          Eat.Sleep.Surf.Repeat.

                          Comment


                          • #28
                            Took advantage of the sun and a early finish yesterday and.....
                            The front diff plunger linked out.
                            That way I don't have to keep checking that it has engaged.
                            The collar does slide over, but just needed to have that bit eliminated.
                            Voltage is indeed getting to the motor.
                            Broke out my dc clamp meter and at peak amps the transfer case motor is pulling 13 amps.
                            Now on the button the motor does not allow enough travel to engage 4wd.
                            With a spare battery slid under the truck and some flying leads I can get the motor to have full travel to engage and disengage the 4wd.

                            So I must have the timing disk in the wrong location.
                            Eat.Sleep.Surf.Repeat.

                            Comment


                            • #29
                              Sounds like you've made good progress....

                              Comment


                              • #30
                                Originally posted by andyverran View Post
                                Sounds like you've made good progress....
                                I really hope so, I really do.
                                Eat.Sleep.Surf.Repeat.

                                Comment

                                Working...
                                X