yobit eobot.com

Announcement

Collapse
No announcement yet.

Rear Window Motor Repair Guide

Collapse
X
 
  • Filter
  • Time
  • Show
Clear All
new posts

  • Rear Window Motor Repair Guide

    A few tips on repairing a split drive section on the rear window motor.

    A lot of stuff has been mentioned before and I don't want to get too technical so it's basically a simple guide.

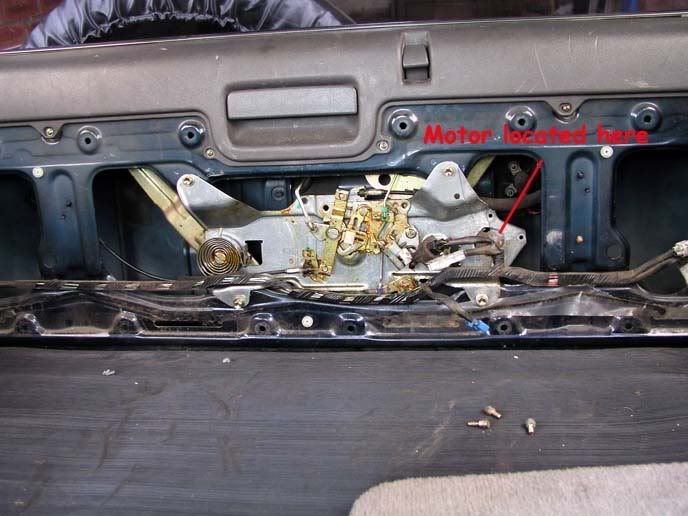
    1. Remove the carpeted and metal section from the rear door.


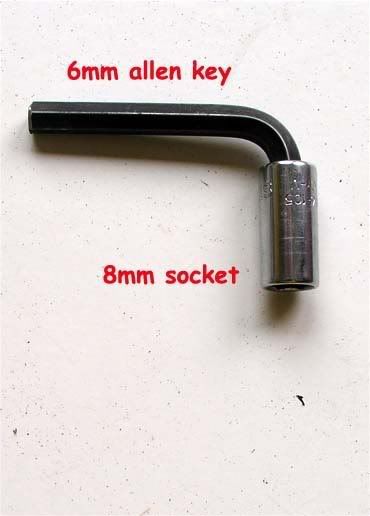
    2. Remove the 3 bolts from the back of the motor, handy tip cut down an allen key and fit it to an 8mm socket, that way you have room to manoeuvre.


    3. Disconnect the wiring and remove the motor.

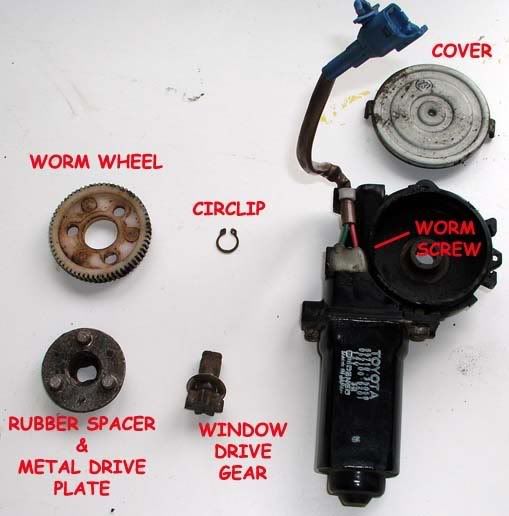
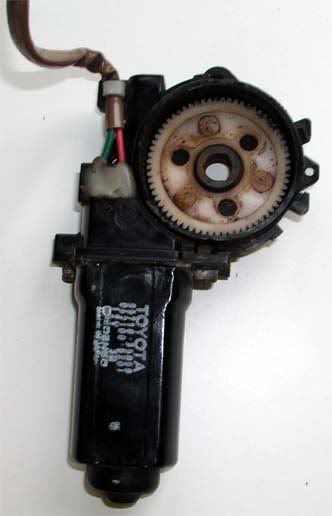
    4. Strip the motor down to these parts.


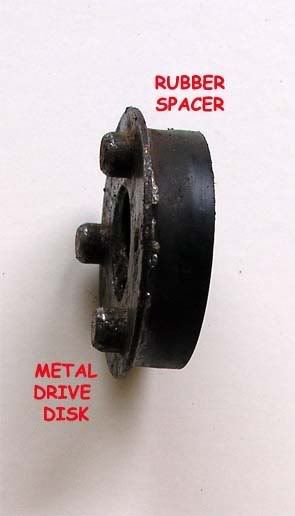
    4. In my case the rubber spacer / shock absorber had come adrift from the metal drive disk.


    5. Glue and clamp the pieces back together and leave overnight.

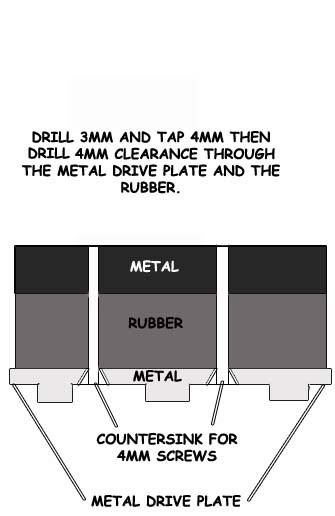
    Nice tip from madcampbell - drill and countersink the metal plate in 3 places, and drill and tap the metal section of the rubber spacer / shock absorber, I would suggest 4mm. You can then bolt the rubber and metal sections together for added security. Sorry for the ropey drawing!


    6. Reassemble the parts - worm wheel in first.


    Then the rubber and metal drive section.


    Refit the window drive gear shaft and secure it in place with the circlip. If the circlip does not sit properly in the groove gentley deepen the goove with a junior hacksaw until the circlip has a firm hold, otherwise it will spring lose once the motor is operated.

    Refit the cover and clip it into place.

    7. Refit the motor, metal cover plate and carpeted cover.

    Hope this all makes sense! Any questions please ask.

    Jim.
    Last edited by Scorpion; 25 June 2007, 19:58.
    'Tis better to sting than to be stung!

  • #2
    Excellent write up mate, i've printed it to put in me "how to do it folder" expect i'll have to do this before long,


    Me colour cartridge is running out!!
    Too young to die and too old to give a toss

    Comment


    • #3
      Top Job there.The only thing I would add is that you can counter sink, drill and self tap the two bits back together as well as glue or instead of. This means it realy won't come apart again. That's what I did to mine a year ago.

      Comment


      • #4
        Originally posted by madcampbell
        Top Job there.The only thing I would add is that you can counter sink, drill and self tap the two bits back together as well as glue or instead of. This means it realy won't come apart again. That's what I did to mine a year ago.
        Top idea mate! I'd read that somewhere before (your post maybe?) I've now added that info to the guide.

        Cheers. Jim.
        'Tis better to sting than to be stung!

        Comment


        • #5
          Originally posted by Copycat
          Top idea mate! I'd read that somewhere before (your post maybe?) I've now added that info to the guide.

          Cheers. Jim.
          Someone on here told me to do that when I had the problem and it has worked a treat.

          Mark

          Comment


          • #6
            Originally posted by ian619
            Excellent write up mate, i've printed it to put in me "how to do it folder" expect i'll have to do this before long,


            Me colour cartridge is running out!!
            Cheers Ian, had to modify my write up mate. You have to drill and tap the metal section of the rubber spacer / driver and tap that for 4mm countersinks. I had to remove the motor again as I had just glued it and it didn't hold. So I took it to work today and fitted the screw mod. It's working fine now. Sorry for the confusion. Jim.
            'Tis better to sting than to be stung!

            Comment


            • #7
              Will a carina motor straight swap for this motor? if so I've found 4 in a
              breakers near me in Leeds.

              Comment


              • #8
                Dunno, mate. There have been previous posts regarding compatible motors but not sure if the Carina was amongst them. If it is buy all 4 and make a fortune selling them!
                'Tis better to sting than to be stung!

                Comment


                • #9
                  Thats ok jim, i printed the update as well, i think the corolla rear door motor is a straight swop, and probably a few other toyota models, would have to compair em,
                  Too young to die and too old to give a toss

                  Comment


                  • #10
                    The toyota hiace passenger side is the same motor aswell as i got one for Clayton and it works a treat
                    https://www.facebook.com/groups/henpals/

                    Comment


                    • #11
                      another trick

                      @copycat, thanks to your great guide above, you have encouraged another non-mechanic to fix something on the truck and impress his wife.

                      Nice one.

                      Here's some other simple stuff that'll help make it easier for others I hope.

                      Open the back window down all the way, open down the back door and take off carpets etc as described.

                      Pop off the metallic window motor cover, and you can turn that cog so the the window manually goes back up - that and carefully pulling at the same time.

                      While it looks dodgy to see that glass just hanging there, it means you free up some space inside the door to work - you don't need the fingers of a small monkey to get the motor out and you have less chance of scratching the glass - see?

                      Also, when the glueing trick fails (as it did for me) and you decide to bolt the metal/rubber/cog together - if you look carefully you will see there are 2 holes already drilled in the metal bit - go through them.

                      I used some 3x20ml bolts and chopped the residue off with a hacksaw.

                      Back win goes up and down at speed now! None of that horrible squeaking either... Cheers.

                      Comment


                      • #12
                        Should get admin to post as a sticky in the tech section, also be worth posting on the Oz site, seeing as we nick all their tech stuff.
                        Rob

                        Still working for the man!

                        Comment


                        • #13
                          happy newbie - rear window works!

                          Just wanted to say a big thanks to everyone who has posted info about rear windows that won't go up and down. Especially Scorpion's diagrams and Allen Key tip!!!!

                          Ours now goes up and down, up and down, up and down - fab
                          happy newbie

                          Comment


                          • #14
                            Thanks mate, I remember writing that guide back in 2007 and I tried to find it again, without success, a few months back. Well done to you for trawling through all the old 'rear windows' posts!
                            'Tis better to sting than to be stung!

                            Comment


                            • #15
                              Sticky time? So easier to find again.
                              .... Which was nice.

                              Comment

                              Working...
                              X